Mikrotik RB941-2nD HAP Lite 最低價的家用路由器

Mikrotik RB941-2nD  HAP Lite 這款是目前最低價的家用路由器,適用於家庭或者小型辦公室等小面積環境;內置WPS按鈕,更便利於接入網路

此設備還支援更改為CAP模式,按下WPS可直接加入CAPsMAN無線管理系統。

機器配備 650MHz CPU,32MB RAM,2.4GHz 無線,L4授權,四個100m乙太網口。

每一口都能獨立設置為WAN口 {a63}  {a14}  {a14}  {a14} 

RB941-2nD 性能測試

跑測速100M時CPU 56%負荷

無線規格

2.4 GHz
TX RX
1MBit/s 22 -96
11MBit/s 22 -89
6MBit/s 20 -93
54MBit/s 18 -74
MCS0 20 -93
MCS7 16 -71

官方性能測試結果

RB941-2nD QCA9531 100M all port test
Mode Configuration 1518 byte 512 byte 64 byte
kpps Mbps kpps Mbps kpps Mbps
Bridging none (fast path) 32.5 394.8 94.0 385.0 173.6 88.9
Bridging 25 bridge filter rules 32.5 394.8 56.1 229.8 56.7 29.0
Routing none (fast path) 32.5 394.8 94.0 385.0 160.8 82.3
Routing 25 simple queues 32.5 394.8 63.7 260.9 72.6 37.2
Routing 25 ip filter rules 32.5 394.8 33.8 138.4 34.6 17.7
  1. All tests are done with Xena Networks specialized test equipment (XenaBay),and done according to RFC2544 (Xena2544)
  2. Max throughput is determined with 30+ second attempts with 0,1% packet loss tolerance in 64, 512, 1518 byte packet sizes
  3. Values in Italic indicate that max throughput was reached without maxing out CPU, but because board interface configuration was maxed out
  4. Test results show device maximum performance, and are reached using mentioned hardware and software configuration, different configurations most likely will result in lower results
分類: RouterOS | 14 則留言

如何對你的ROS降版(降低版本)

電腦先準備好你想降級的版本

這邊可以下載(天朝的話可能要爬牆)

解壓縮後

然後選主選單選擇System底下的Packages

這個 Downgrade

按下去後,路由器會重開機

大概等待1-3分鐘後會降版更新完成

更新期間千萬不可以斷電


以上,祝好運!!

分類: RouterOS | 1 則留言

利用.htaccess來保護主機下的目錄與檔案

出處 http://sofree.cc/htaccess-index/

一般來說蠻多虛擬主機預設是沒有開啟保護網站主機目錄下的檔案,其實蠻危險的,假若你的目錄下忘記放置index檔案,那很可能您目錄就被看光,一個不小心很可能重要資料就被拿走,這是蠻嚴重的一件事情。如果是Linux主機,我們可以透過簡易的.htaccess語法來保護網站主機目錄下的檔案,讓別人無法輕易看見。


平常我們使用的最簡單保護目錄的方法,莫過於使用「index.php」、「index.html」等等之類的網站index檔案,因為主機內預設的設定在目錄中預設就是要抓index檔案,而index檔案通常會有很多種,主機會依續排列下來抓取,所以可以設定index檔案來讓主機抓取,以達到保護目錄的效果。但如果主機需要的index檔案沒有一個存在,這時候主機就會直接顯示目錄內的東西了,因為主機不知道要抓取誰當作主要網頁,所以會全部顯示。

雖然使用index檔案來保護目錄是可行的,但是每個子目錄都需要傳一個index檔案其實蠻累人的,這時候我們就可以利用「.htaccess」來批量處理,不知道大家還記不記得之前介紹過很多「.htaccess」的妙用,例如圖片防盜連封鎖搜尋引擎封鎖特定國家的訪客等等,都是利用.htaccess來達成,這回要防止主機下的目錄、檔案被看光,一樣也是利用它,我們只要在網站根目錄建立一個.htaccess檔案就可以保護所有子目錄囉!

產生.htaccess檔案

如果要使用.htaccess來保護目錄,其實做法很簡單,首先請開啟您的FTP軟體,先開啟FTP軟體可以顯示.htaccess隱藏檔案,然後連線到您網站的FTP,如果上面已經有.htaccess請下載回來,如果沒有.htaccess檔案,請您開啟記事本新增一個文字文件,然後儲存檔名是「htaccess.txt」。

利用.htaccess來保護主機下的目錄與檔案

加入保護目錄檔案語法

語法非常的簡單,首先請開啟您剛建立的「.htaccess」檔案,在檔案的最開頭加入以下語法一小段語法就可以了。

Options -Indexes

接著請您將.htaccess.txt存檔並將檔案上傳您的網站的FTP空間,接著請在FTP端將剛剛上傳的檔案更名為「.htaccess」,如果沒有更正,那.htaccess檔案是不會產生任何保護目錄的效果喔!

利用.htaccess來保護主機下的目錄與檔案

Forbidden 網頁禁止存取

在還沒使用禁止存取目錄的語法之前,目錄下所有檔案或是資料夾訪客可以一目瞭然的看光光,也可以輕鬆將所有檔案下載走,如果目錄內存有重要的資料,就很有可能被下載走,那就危險了。利用.htaccess來保護主機下的目錄與檔案

當我們使用剛剛的一小串語法後,你會清楚的看到主機端會告訴你,你沒有權限存取這個目錄下所有的東西,這樣別人就不知道你這個目錄下到底放了什麼檔案囉!當然使用了這個語法並不會你網站在存取這個檔案的權限,它只是讓你無法在該目錄下看到,但事實上,若你網站上有使用到這檔案,還是可以正常使用的,圖片不會出現錯誤、檔案下載也不會無法下載。

利用.htaccess來保護主機下的目錄與檔案

語法的進階使用

當然該語法還有其他相關的用途,以下列出簡單的幾項供大家參考使用,如果你覺得以下的語法不是你想要或是想學更多,你可以到Apache官方網站來看看英文說明書,查看看還有什麼關於「indexoptions」的用途或是其他不錯的功能喔!

  • Options +Indexes:顯示目錄下所有檔案
  • Options -Indexes:隱藏目錄下所有檔案 (上面已經介紹過)
  • IndexOptions +FancyIndexing:顯示目錄下所有檔案,檔案前面包含檔案類型的小圖示
  • IndexOptions -FancyIndexing : 顯示目錄下所有檔案,但不包含檔案類型的小圖示
  • IndexIgnore *.php *.exe:隱藏特定的檔案, 其餘檔案正常顯示(隱藏所有的php和exe檔案)


分類: RouterOS | 發佈留言

讓putty、pietty、git在ubuntu設定ssh達到免密碼登入

文章出處

http://bjstation.pixnet.net/blog/post/31779220-%5Bputty%5D-ssh-%E8%87%AA%E5%8B%95%E7%99%BB%E5%85%A5

1. 先到 Putty 官方網頁  下載 putty, puttygen.exe, pageant.exe

2. 在puttygen產生按下[Gererate]產生key, 此時會要求輸入key的Passphrase

3. 完成後(我大概等了3分鐘吧), 複製public key, 然後在要連線主機的 ~/.ssh/ 下建立 authorized_keys, 內容剛剛我們複製 public key的內容,

記得要把權限改 600

4. 儲存private key在自己的電腦上

5. 接著要設定putty, 在Connection->Data設定連線帳戶名稱

6. 在SSH->Auth 把我們產生的private key讀進來

7. 回到session按下儲存(囧, 我到今天才知道load按鈕是啥>”<)

8. 此時連線的話, 主機仍會要求輸入key的Passphrase… (這叫什麼自動連線啊!!!)

9. 這時我們打開pageant.exe, 然後把我們本機的private key加進來, 此時也會要求輸入key的Passphrase

10. 自動連線吧!!! BOY!!!

11. 把pageant.exe, 還有下面這段bash檔加入啟動中, 大功告成!!!

“YourPath\pageant.exe” YourPath\private_key.ppk


文章出處

http://blog.kejyun.com/2012/11/setting-ssh-key-to-achieve-non-password-login-on-ubuntu.html


讓putty、pietty、git在ubuntu設定ssh達到免密碼登入功能

1 ) ssh設定

 使用puttygen

  • 產生ssh key
開啟puttygen,點選generate按鈕,然後用滑鼠在puttygen的視窗隨意的滑動,產生專屬於你自己的ssh key,然後再點選Save private key按鈕儲存密鑰(不要輸入key passphrase跟confirm passphrase,不然你再登入的時候還是要輸入你的密鑰密碼,這樣就沒有達到免密碼登入的意義了),我這裡是存成kejyun.ppk的檔名

  • 設定sshkey
將puttygen上方的Public key for pasting into OpenSSH authorized_keys file下方的內容(公鑰)複製起來

到你要使用ssh免輸入密碼自動登入帳號的家目錄(/home/kejyun)底下,將剛剛複製的公鑰貼到家目錄下的.ssh/authorized_keys(/home/kejyun/.ssh/authorized_keys)檔案中,若沒有此目錄或檔案可以自行建立即可,authorized_keys裡面可以有很多把公鑰,所以就可以用不同的密鑰登入

使用ubuntu內建程式

  • 產生ssh key
輸入ssh-keygen -t rsa指令建立ssh key,一直enter下去使用預設值(檔名id_rsa&沒有密碼),之後就會產生兩個檔案id_rsa(密鑰)id_rsa.pub(公鑰)
  • 設定ssh key

輸入cat ~/.ssh/id_rsa.pub >> ~/.ssh/authorized_keys,將公鑰匯入authorized_keys中

2 ) 設定putty(pietty)自動登入

  • 使用ubuntu內建程式必須要轉換產生的密鑰
將id_rsa的檔案從ubuntu中取出,開啟puttygen,點選Conversions > Import key將id_rsa檔案匯入,之後再點選Save private key儲存密鑰檔名為id_rsa.ppk
  • 使用pietty(putty不需要此步驟)

點選PuTTY模式,進入putty設定金鑰資訊

在左側選單Connection / SSH / Auth中,勾選Attempt TIS or CryptoCard auth(SSH-1)取消勾選Attempt "keyboard-interactive" auth(SSH-2),並將Private key file for authentication設定為剛剛產生的密鑰kejyun.ppk(id_rsa.ppk)

在左側選單Connection / Data中,設定自動登入使用的帳號名稱kejyun

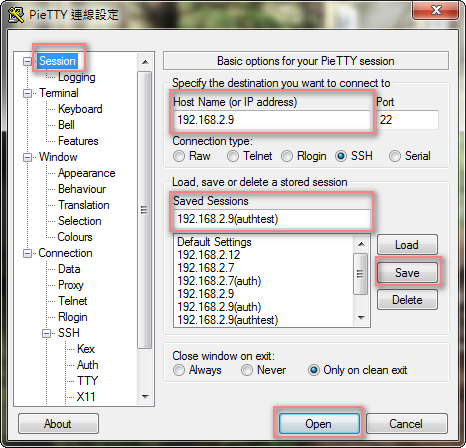
在左側選單Session中,設定主機的Host Name(192.168.2.9)以及你這次設定要儲存的設定檔名稱Saved Sessions(192.168.2.9(authtest)),點選Save儲存此次設定,再來點選Open即可自動登入ubuntu

設定git自動登入

在TortoiseGit的選單Git / Remote中,設定完Remote、url及剛剛產生的密鑰kejyun.ppk(id_rsa.ppk),即可自動登入推拉git檔案了
分類: RouterOS | 發佈留言

MikroTik 最新產品 CRS226-24G-2S+ IN 10G交換機 switch level 3

CRS226-24G-2S+IN

Cloud Router Switch is our new member of our Smart Switch series. It combines the best features of a fully functional router and a Layer 3 switch, is powered by the familiar RouterOS. All the specific Switch configuration options are available in a special Switch menu, but if you want, ports can be removed from the switch configuration, and used for routing purposes. The CRS226 uses a new class of switch chips, which allows us to have two SFP+ ports for 10G connectivity.


二個10G SFP+

Product specifications

Details
Product code CRS226-24G-2S+IN
SFP DDMI Yes
CPU nominal frequency 400 MHz
CPU core count 1
Size of RAM 64 MB
Architecture MIPS-BE
10/100 Ethernet ports None
10/100/1000 Ethernet ports 24
MiniPCI slots 0
MiniPCI-e slots 0
Wireless chip model None
Number of USB ports 0
Power Jack 1
Supported input voltage 8 V – 30 V
PoE in Yes
PoE out No
Voltage Monitor Yes
CPU temperature monitor No
PCB temperature monitor Yes
Dimensions 285x145x45mm
Operating System RouterOS
Operating temperature range -35C to +65C
License level 5
Current Monitor No
CPU QCA8519-AC2C
Max Power consumption 21 W
SFP ports None
SFP+ ports 2
Serial port RJ45


分類: RouterOS | 1 則留言

UBNT TOUGHSwitch PoE PRO TS-8-PRO POE交換機


VLAN設定


1000m LED燈號顏色為綠色(右邊那棵)

10/100m LED燈號顏色為黃色

POE  LED燈號顏色24V為綠色(右邊那棵)

POE  LED燈號顏色48V為黃色(箭頭處)

POE 燈號不亮則為無電壓輸出

分類: RouterOS | 1 則留言

RouterOS 取消瀏覽器中文化的方法

如果不想用漢化的頁面,把底下的檔案刪除即可.

分類: RouterOS | 1 則留言

IP-MAC綁定,未綁定的IP無法連上網路

這個網上教學太多了,大家參考他們的就行

原文連結如下

应用要求:将IP与MAC地址绑定,禁止改IP与改MAC地址者上网。

1、IP—ARP

当ROS做通了后,局域网内所有主机能都能上网,此时,ROS会通过ARP获得内网所有主机的IP–MAC地址,所有IP–MAC地址条目前都标示“D”(Dynamic),表示动态的未做绑定的IP-MAC条目。如下所示:

如果确认公司暂无人更改IP,可以直接一个一个选中,双击,弹出如下对话框,点击“Make Static”,就能将IP-MAC绑定,


绑定后,如下所示:


确保所有IP都正确,可以拿出IP-MAC对照表,与此进行对照,如果不匹配,说明有人擅自修改,不做绑定,待其不能上网时,自会找到你,那时再帮其正确绑定。

2、Interface—Ethernet

如下图所示:

双击lan内网,弹出如下所示对话框:

关闭ROS的lan接口的ARP请求功能,只保留ARP应答功能,以便让ROS不能自动获取对方的IP-MAC。

这里选择“reply-only”,如下所示:

如下所示,然后“OK”确定即可。

分類: RouterOS | 1 則留言

Mikrotik DHCP option 43 How to


Mikrotik DHCP option 43 How to

After doing a lot of searching, I could not find an easy guide on how to add the option 43 to DHCP on a Mikrotik and get my APs to connect to a remote Controller so I figured I would write one.

My Setup:
Mikrotik 750 (v5.4 os) (Default config)
Unifi 2.2 controller on ubuntu VMWARE guest (Public IP: 192.168.200.10)

1. Convert your public IP to hex. The option 43 value has to be in HEX to work.
192=C0
168=A8
200=C8
10=0A
2. Your option 43 value will be “0x0104” + the HEX of the IP.
So in my example it is: “0x0104C0A8C80A”
3. Open up a new terminal on your Mikrotik or ssh in and type:
/ip dhcp-server option add code=43 name=unifi value=0x0104C0A8C80A
/ip dhcp-server network set 0 dhcp-option=unifi
My router was using the default config so only one network was present ID 0. You could do “/ip dhcp-server network print” to see the list and pick the ID of the network you want to add the option to.
4. Plug in your UAP and it should grab the info and show up on the remote Unifi controller asking to be adopted.

Troubleshooting:
Older UAPs have older firmware. The older firmware does not ask DHCP for option 43. Pulled my hair out for a few hours on this one. The way I found this was by turning on DHCP logging and watched the DHCP Discover. It was not asking for “VendorSpecific” which is option 43. If you have these you have a few options.
1. Upgrade the firmware in the lab by connecting them to a local Controller, adopting them and then “paper-clip” them.
2. Use the discovery tool on them to make them connect.
3. Use DNS. I prefer not to use this method but it does work even on older firmware. In your DHCP server config put in a domain name that you control. Then add a unifi A record pointing to the remote unif controller. Some will say this is easier than Option 43. However if you are doing many different controllers you would have to setup lots of sub-domains and such. And that domain will be default domain name on any hosts connecting on that network.

分類: RouterOS | 發佈留言

為你的RouterOS 設定NAT loopback (Hairpin NAT)

如果你的電腦在路由器底下想要透過公網IP或是網址訪問同一個區網底下伺服器的話,

這時因為NAT loopback問題會導致你無法訪問你的區網內的伺服器.

底下是官網的教學,官方稱它叫作 Hairpin NAT(這個網站教學一直以來都是給初學者看的,大嬸請繞路.)


設定方式如下..


1.假設你的網段是192.168.88.xxx

2.假設你的WEB伺服器是192.168.88.8

底下這張圖第0行是基本的port mapping,就不另外多解釋.

/ip firewall nat
add chain=dstnat in-interface=pppoe-out1 protocol=tcp dst-port=80 \
  action=dst-nat to-address=192.168.88.8 to-port=80
add chain=srcnat out-interface=pppoe-out1 action=masquerade


防火牆第1行開始做起(底下5900改成你自己需要的PORT,例如80)

/ip firewall nat
add chain=dstnat dst-address-type=local protocol=tcp dst-port=80 \
  action=dst-nat to-address=192.168.88.8 to-port=80


第三行的設定(底下5900改成你自己需要的PORT,例如80)

/ip firewall nat add chain=srcnat src-address=192.168.88.0/24 \ dst-address=192.168.88.8 protocol=tcp dst-port=80 \ out-interface=bridge-local action=masquerade

大功告成.

底下這個網址可以自行測試設定是否有成功

https://www.yougetsignal.com/tools/open-ports/


分類: RouterOS | 2 則留言